Tuesday, February 28, 2012

My Wreaths

I have been working on some Carolina and Clemson wreaths.  I think they turned out great.  I sold one today and my friend was very pleased.  They are full and very pretty.  I have been looking at others and there are so many, but I have not been impressed.  The quality is not there and the price people are asking is too high.  I am selling mine for $40.00.  The nice thing about these is that they are water proof and can take some of our crazy weather.  I am enjoying the fun of working at my own pace and not feeling pressured!  It has been a fun experience.  I added some ribbon to add some interest and make the wreaths more perky.  See what you think.


If anyone is interested the wreaths sell for $40.00.  I would be glad to make anything custom if you would like.  I am working on a custom wreath order for summer.  I will post it when it is finished.  Having a good time and every now and then when the sun is shining you may find me out dancing in the sun!  Keep crafting....

Tuesday, January 24, 2012

Tooth Fairy Pillows

I have just finished another project that I have been wanting to do.  I remember asking myself, where do you put that child's tooth for the tooth fairy to visit during the night and leave some money.  Teeth get lost, fairy forgets to come......anyway when I saw this idea, yes on Pinterest......I decided to try my own!  I picked out some cute fabric, made a pocket and placed a tooth on the pocket.  This is a little different from some I saw.  I stuffed the little tooth slightly and hand-sewed it onto the pocket.  I then went to my sewing machine and stitched around the pocket to attach it to the front fabric panel.  Another idea I had was to add some ribbon to hang the pillow from a door knob or bed post.  I pinned the ribbon inside the back and front piece of fabric and sewed around three sides.  I left the bottom open to stuff a little stuffing inside to make it more like a little pillow.  I then closed the bottom on my machine and trimmed up the threads and the project was finished.  I think they turned out so cute and I think it is a great usable project.


                               Also made some things moms can use like burp cloths and boo boo rice                                                    bags.


Thursday, January 12, 2012

Quiet Books

I just finished up two quiet books for my two grandsons, Levi and Mason.  Levi is three and Mason is one and a half.  I had wanted to give these to them for their Christmas presents.  It is a very intense project, requiring lots of patience and thought.  I have loved doing them and hope they will have many hours of enjoyment from them.  I am going to show you step by step my process of making these two books.

First I had to decide what fabric to use keeping in mind the picture it would depict....I then started laying out my ideas for patterns.  I recommend making your items larger for small hands, plus when you start stitching it helps.


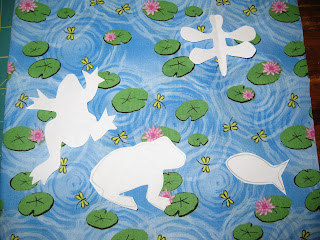


Each page is 9 inches by 18 inches.  Keep in mind how you want to arrange the pictures.  Sometimes you will use the 18 inches in full for something.  I needed it for the under the sea scene and the mailbox page, and the garden page.  You will see what I mean in the next pictures.  Once I cut out the images and pinned them where I wanted them on the cloth, I began to hand stitch each item.  I had thought of using the sewing machine and perhaps will  another time.  I actually enjoyed doing them by hand.  I used a thin batting between the pages.  I cut this smaller so that when I used the sewing machine to go around the page for the final finishing off process, it would not be too thick.  It worked out great.  The batting gave some body to the fabric.  Some of the fabric was thin and others were a little thicker.  I used some denim on one section.


On every page I tried to have a way to store the decorations.  In the sea scene there is a sea chest, including a little fabric pirate map.  All of the animals can go back into the chest for storage.  The next page is a weaving page, and then the flowers which can be unbuttoned and stored in the flower pot.  Next is the garden, with little pockets to plant and store the carrots and beets.  The pig and chicken are finger puppets.  The mailbox actually opens and will hold any little notes that are written.  Note the pocket that holds the paper pad and the pen.  I tucked a red heart in the mailbox!  A snowman to dress up.  You cannot see it, but there is a clear plastic square to hold all of his clothes.  And last comes a truck that you can take the wheels off and some cloth cut to look like dirt to load in the back.  The little door opens and closes too.  After sewing this all together, I probably could have cut the truck a little smaller.
After tucking in two handles, made from sturdy ribbon to tote this little book and a closure to hold it together, I stitches around the entire page and then trimmed with pinking shears.  You then find the center of all the layers and stitch down the middle for the finishing touch.  It will alter the size a tad as does some of the bulk, stitching, etc.  All in all I have enjoyed making this project and have some other ideas in mind.  Will share those when I do them.  This project is not hard, it just requires a lot of time.  Of course I was making two and not one, so that accounts for more time involved!  For any one interested, I would recommend this.  It is something that you cannot buy and I hope it will bring some joy and fun for Levi and Mason.  It was made with lots of love!

Wednesday, December 28, 2011

After Christmas

 This time last year....what a difference this year!!  We had on our short sleeves and flip flops last week!


Hope everyone had a blessed Christmas.  We did.  It was a busy time.  I did some baking with the help of my grandchildren.  I would get one on a different day and we would make something crafty and bake something.  One day we made gingerbread cookies.  Another day we made pretzel sticks dipped in white chocolate and sprinkled with Christmas colored mini sprinkles.  The last day we made pretzel hugs and mini brownie peanut butter bites!  Our craft was a gallon milk jug decorated with a snowman's face (stickers).  A hole was cut in the back side and we put clear twinkle lights inside.  They really turned out cute.  One day I had some apples that had mellowed out and I decided to make some apple butter in the crock pot.  Turned out very good!  Made some nice Christmas gifts.  I had to come to a stand still in my crafting.  I am sure you can  relate.  I cleaned up my craft space and you would be proud.
I am now considering what to start on next.  I never got to sew anything that was on my list.  I want to make quiet books for my two grandsons.  I ran out of time before Christmas.  I will keep you posted on those.  I also did not get to paint anything.  I want to make some signs and some canvas projects.  I will post as I get into that project.  I have run out of my handmade cards.  I will get back into stamping, cutting and creating with paper.  As you can see I have a lot to do.  I am excited and I am working towards a goal.
Let me know what some of you are working on.  Enjoy being creative.....it is a gift from God.  Happy New Year in 2012.  May it be a blessed year for you and yours.

Sunday, November 20, 2011

Something to Share

I have not had a lot of time as of late....Lots going on right now.  I have so many ideas and just have to work it in.  I did do a great etching project for a wedding gift.  I did not take pictures, but will next time I do it.  I bought several Pyrex baking dishes, 13 x 9 and one a little smaller.  I cut out the couple's last name on my Circut machine and used the stencil to etch ( you will find etching cream at craft store) their name on the outside of the dishes.  It turned out great and I intend to do the same to mine.  When you take a covered dish somewhere, you can identify yours immediately or if someone needs to return your dish....your name is right there.  I will post some pictures soon, when I do mine.

Still playing with my Circut and my vinyl.....I had seen this idea on Pinterest of course and have been wanting to do it.  I found this container at our local IGA grocery store for $1.89.  It has four dividers inside and a cover with a handle.  I have been looking for a cake container like this also.  I think it would make a great gift for someone and making it personal is what makes it special for them.


Yes, this time I did add the polka dots and I think it fits the item and makes it fun and festive!

I also found some glass plates in my craft storage area.....I have so many things that I have bought and saved for just the right project and this is what I did.  I cut from my Circut machine, using the Joys of the Season cartridge, and placed the vinyl cut out on the bottom side of the plates.  I think I read that you don't want the vinyl right where it would come in contact with your food.  The only thing to watch for would be letters and numbers that would be backwards when the plate is turned over to use.  I picked out some Christmas themes and decided to use all white.  I will enjoy using them for the holidays. Because they are clear and have the white design, it should show up well on a Christmas place mat, etc.  May post pictures later of my table setting!!


These projects are so easy and so inexpensive to make.  It just takes a little time and thought!!  Will post things as I get them done.  Happy crafting and Happy Thanksgiving!